

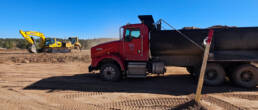
Before any grading equipment shows up on site, a surprising amount of engineering work needs to happen first. Skipping or rushing these early steps is one of the most common reasons civil engineering projects run into delays, unexpected costs, or rework once construction is already underway. In many cases, the issues that derail a project timeline were entirely avoidable with a bit more planning upfront.
Whether you are developing a commercial lot, a municipal facility, or a larger site development project, the steps below outline how to properly prepare a site before civil engineering and grading work begins. Following this process helps identify potential issues early, when they are far less expensive to address, and gives contractors a clearer, more reliable plan to build from once work is underway.
Step 1: Start with a Geotechnical Site Investigation
Every site development project should begin with a geotechnical investigation, not a grading plan. Soil conditions vary significantly from site to site, and even across different areas of the same property, which means assumptions based on nearby projects are not reliable.
A proper investigation typically includes soil borings, laboratory testing, and an evaluation of bearing capacity, groundwater levels, and any potential slope stability concerns. This data becomes the foundation for every decision that follows, from how deep footings need to be to whether soil import or export will be required to reach proper grades.
Property owners who skip this step often find out about soil issues only after construction begins, when correcting the problem is far more disruptive and expensive than it would have been during planning. Common findings from an early investigation include expansive clay soils that require specific foundation designs, shallow groundwater that affects excavation planning, or fill material from previous site uses that needs to be removed before construction can proceed. Catching these issues on paper, rather than in the field once equipment has already mobilized, is one of the clearest ways to protect a project budget.
An experienced geotechnical engineering team can complete this investigation quickly enough to keep your overall project timeline on track, while still providing the level of detail needed for a reliable grading and foundation design.
Step 2: Review Drainage and Stormwater Requirements
Drainage is one of the most overlooked aspects of site preparation, and it is also one of the most heavily regulated. Local jurisdictions typically have specific requirements for how stormwater must be managed on a site, both during construction and after the project is complete.
Understand Existing Drainage Patterns
Before a grading plan can be developed, engineers need to understand how water currently moves across the site and where it drains to. This helps avoid design decisions that could send additional runoff onto neighboring properties or overwhelm existing infrastructure. It also helps identify natural low points on the site that may need to be preserved or redirected as part of the overall drainage strategy.
Plan for Detention and Water Quality
Many jurisdictions require detention ponds, underground storage, or other measures to control the rate and volume of stormwater leaving a site. These systems need to be sized correctly based on the site’s drainage area, soil infiltration rates, and downstream capacity, since undersized systems can lead to flooding complaints and oversized systems waste valuable buildable area. A civil engineering team can design these systems to meet local requirements while minimizing the amount of usable site area they take up, and can also advise on which approach tends to move through local review fastest.
Step 3: Confirm Permitting and Utility Considerations
Grading and site development almost always require permits, and the approval process can take longer than property owners expect if applications are incomplete or missing required engineering documentation. Building this review time into the overall project schedule from the start, rather than treating it as an afterthought, helps set realistic expectations for when construction can actually begin.
Local Building Department Approvals
Most jurisdictions require an approved grading plan, drainage report, and sometimes a geotechnical report before issuing permits for site work. Submitting a complete package the first time helps avoid multiple rounds of review comments that can stretch out a timeline by weeks. It also helps to understand which approvals can move in parallel and which ones depend on prior sign-off, since sequencing permit submissions correctly can save meaningful time on a project schedule.
Utility Locates and Easements
Before any excavation begins, existing utility lines need to be located and marked, and any easements affecting the property need to be identified. Overlooking a buried utility line or an easement restriction during planning can force costly redesign work once it is discovered in the field. This step also includes confirming the location and capacity of the utilities a new project will connect to, since undersized existing infrastructure can affect the scope of a site development project.
Step 4: Develop a Grading and Site Plan

With geotechnical data, drainage requirements, and permitting considerations in hand, engineers can develop a grading plan that balances several competing goals at once, including cut and fill quantities, accessibility requirements, and the layout of buildings, parking, and utilities.
- Cut and fill balance: A well-designed grading plan minimizes the amount of soil that needs to be hauled on or off site, which directly affects project cost. Balancing cut and fill onsite whenever possible can meaningfully reduce trucking and disposal expenses.
- Slope and accessibility: Grading needs to account for accessible routes, parking layout, and drainage flow while staying within code-required slope limits for ramps, walkways, and parking areas.
- Utility coordination: Final grades need to align with the depth and layout of water, sewer, and stormwater utilities being installed on the site, since changes to one often affect the other.
- Erosion control: Temporary and permanent erosion control measures should be built into the plan from the start rather than added as an afterthought during construction, particularly on sites with steeper slopes or exposed soil.
- Sequencing: A good grading plan also considers the order that work needs to happen in, so that access roads, staging areas, and utility trenches do not conflict with each other during construction.
This plan becomes the reference document that contractors use throughout construction, so accuracy and clarity at this stage help prevent confusion and rework once equipment is on site. Revisions made after grading has already started are almost always more expensive than the time it takes to get the plan right during design.
Step 5: Schedule Materials Testing and Quality Control
Once grading begins, ongoing testing confirms that the work in the field matches the design and meets applicable specifications. This typically includes compaction testing of fill material, verification of subgrade preparation, and inspection of drainage structures as they are installed. Testing at the right frequency and at the right points in construction helps catch problems while they are still easy to correct, rather than after several more lifts of fill have already been placed on top.
Working with a firm that offers materials testing and construction quality control alongside design services can streamline this process, since the same team that developed the grading plan can also verify that it is being properly executed in the field. That continuity reduces the back and forth that often happens when design and testing are handled by separate companies, and it means test results can be compared directly against the original design intent rather than a generic specification.
Our team also provides field services throughout construction, including monitoring and documentation, to help catch issues before they affect the rest of the project schedule. Consistent documentation throughout this phase also creates a clear record if questions come up later about how the site was prepared.
Site Prep Checklist Before Grading Begins
Before mobilizing equipment for grading or site development, confirm that the following steps have been completed:
- Geotechnical investigation completed, including soil borings and laboratory testing
- Drainage report and stormwater management plan reviewed and approved
- Grading permit and any required drainage permits submitted and approved
- Utility locates completed and easements identified
- Grading plan finalized and reviewed against site accessibility and code requirements
- Materials testing and inspection schedule coordinated with your engineering team
- Erosion and sediment control measures planned for the duration of construction
Working through this list before breaking ground helps avoid the most common causes of delay on civil engineering and site development projects, from permit rejections to unexpected soil conditions discovered mid-construction. A short planning meeting with your engineering team to confirm each item is often enough to catch anything that has been missed before it becomes a bigger problem.
Site Conditions to Consider Across Southern Colorado
Site preparation looks a little different depending on where a project is located. Across Southern Colorado, soil composition, seasonal weather patterns, and local drainage regulations can vary significantly from one community to the next, which is part of why a generic, one-size-fits-all approach to grading rarely works well.
A civil engineering team with direct experience in the region can anticipate conditions that an out-of-area firm might miss, from expansive soils that require specific foundation and grading approaches to local stormwater ordinances that differ between jurisdictions. Working with a local engineering team based in Pueblo and Southern Colorado also tends to shorten the time it takes to schedule site visits, field investigations, and follow-up testing compared to coordinating with a firm located farther away.
This local familiarity matters most in the early stages of a project, when engineers are identifying which site conditions are typical for the area and which ones warrant closer attention before design moves forward. It also helps when questions come up mid-project, since a local team can typically get someone on site faster than a firm working remotely.
Ready to Start Your Site Development Project?
Proper site preparation sets the tone for the rest of a construction project. Our team provides geotechnical investigations, civil engineering, laboratory testing, and construction quality control under one roof, helping property owners, developers, and municipalities move from planning to grading with fewer surprises along the way and a clearer sense of how the project will unfold.
If you have an upcoming site development or grading project, we would welcome the chance to review your scope and answer any questions about the process. Request a Consultation with our team today to get started.
Need Engineering Support for Your Project?
Jesik Consulting & Engineering works with municipalities, utilities, and developers to deliver accurate data, efficient design, and dependable results. Connect with our team to discuss your project requirements.
Like this article? Spread the word!
Related Posts
Good Engineering Isn’t About Spending More Money
Good engineering balances safety and budget. See how cost-effective engineering protects…
Soil & Compaction Testing 101: What Contractors Need to Know Before Pouring
Learn how soil compaction testing works, from Proctor targets to field density tests, and…
Jesik Consulting & Engineering’s Guide to Municipal Infrastructure Engineering in Santa Fe, NM
Planning public infrastructure in Santa Fe, NM? See what municipal engineering involves…